(Note: I have updated the pictures with more information for sewing the neck.)
Yesterday was an amazing day: I was home alone for 6 whole hours!! So, after getting the bread machine setup and the lentil soup in the slow cooker, I was able to sew without interruption. This was only possible by having a good friend pick up my little guy from his nursery school at lunch time. What a treat! Next week it’s my turn to look after her little guy and give her a whole day to herself! She’ll love it!!
This pattern is great, and as the other PR reviewers have said, it’s a terrific base piece! It’s simple and quick to sew up. I did just a few alterations on the arms: shortened them by 2 inches and widened the upper arm by 1 inch. The waist and hips were bang on; I made this in a size 38 as usual. Next time I may slope the shoulders down a bit to try to remove some wrinkling at the bottom of the armhole. The forearms could also do with a little more easing as it’s a bit snug; the fabric is a fine cotton/poly (I think) jersey but with no stretch fibre.

When I read the neck assembly instructions it seemed a bit convoluted! It occurred to me that this was essentially the same as the opening on some pillow cases that I’d made. This is how I did the neck, with pics below (it IS the same top, just different lighting conditions!):

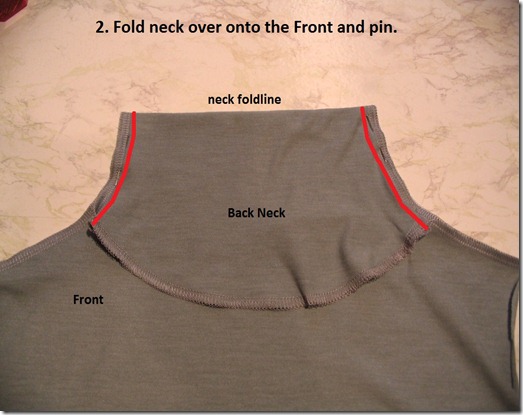


After I did the neck I realized that there’s an even easier way! You don’t even need to do step 1 first, just sew the neck and side seams together in one go at step 4, and baste beforehand. Next top I make I’ll do it this way.
Update: It turns out that this way worked best, it gave the cleanest result. So don’t skip step 1!


%5B2%5D.jpg "2010-10-07 001 (1024x768)")


